Git & GitHub Tutorial
Table of Contents
While exploring difference, never lose sight of sameness for it is sameness that brings us together. – John Briggs

1. Primer
1.1. What is Version Control
Version control systems are a category of software tools that help a software team manage changes to source code over time. Version control software keeps track of every modification to the code in a special kind of database. If a mistake is made, developers can turn back the clock and compare earlier versions of the code to help fix the mistake while minimizing disruption to all team members.
For almost all software projects, the source code is like the crown jewels - a precious asset whose value must be protected. For most software teams, the source code is a repository of the invaluable knowledge and understanding about the problem domain that the developers have collected and refined through careful effort. Version control protects source code from both catastrophe and the casual degradation of human error and unintended consequences.
Software developers working in teams are continually writing new source code and changing existing source code. The code for a project, app or software component is typically organized in a folder structure or "file tree". One developer on the team may be working on a new feature while another developer fixes an unrelated bug by changing code, each developer may make their changes in several parts of the file tree.
Version control helps teams solve these kinds of problems, tracking every individual change by each contributor and helping prevent concurrent work from conflicting. Changes made in one part of the software can be incompatible with those made by another developer working at the same time. This problem should be discovered and solved in an orderly manner without blocking the work of the rest of the team. Further, in all software development, any change can introduce new bugs on its own and new software can't be trusted until it's tested. So testing and development proceed together until a new version is ready.
Good version control software supports a developer's preferred workflow without imposing one particular way of working. Ideally it also works on any platform, rather than dictate what operating system or tool chain developers must use. Great version control systems facilitate a smooth and continuous flow of changes to the code rather than the frustrating and clumsy mechanism of file locking - giving the green light to one developer at the expense of blocking the progress of others.
Software teams that do not use any form of version control often run into problems like not knowing which changes that have been made are available to users or the creation of incompatible changes between two unrelated pieces of work that must then be painstakingly untangled and reworked. If you're a developer who has never used version control you may have added versions to your files, perhaps with suffixes like "final" or "latest" and then had to later deal with a new final version. Perhaps you've commented out code blocks because you want to disable certain functionality without deleting the code, fearing that there may be a use for it later. Version control is a way out of these problems.
Version control software is an essential part of the every-day of the modern software team's professional practices. Individual software developers who are accustomed to working with a capable version control system in their teams typically recognize the incredible value version control also gives them even on small solo projects. Once accustomed to the powerful benefits of version control systems, many developers wouldn't consider working without it even for non-software projects.
1.2. Team Work
1.2.1. centralized & distributed
2. Git Introduction
2.1. What is Git
Git is a modern version-control system for tracking changes in any set of computer files and coordinating work on those digital files among multiple people. Its goals include speed, data integrity, and support for distributed, non-linear workflows in teamwork. Git is released as free and open-source software distributed under the terms of the GNU General Public License version 2.
2.1.1. Performance
2.1.2. Security
2.1.3. Flexibility
2.2. History
Git was created by Linus Torvalds in 2005 for development of the Linux kernel, with other kernel developers contributing to its initial development. Its current maintainer since 2005 is Junio Hamano.
2.3. Culture
2.4. Installation of Git
2.4.1. Install Git on Mac OS X
There are several ways to install Git on a Mac. In fact, if you've installed XCode (or it's Command Line Tools), Git may already be installed. To find out, open a terminal and enter git –version.
git --version
- Git for Mac Installer the latest Git for Mac installer.
- Install Git with Homebrew
brew install git
2.4.2. Install Git on Windows
The latest Git for Windows installe.
2.4.3. Install Git on Linux
- Debian / Ubuntu
sudo apt-get update
                  sudo apt-get install git
2.4.4. Configure your Git username and email
Configure your Git username and email using the following commands, replacing "Your name" with your own. These details will be associated with any commits that you create:
git config --global user.name "Your name"
                  git config --global user.email "Your email address"
3. Getting Started
3.1. Basic settings
$ git config –global user.name "Your Name" $ git config –global user.email "youremail@example.com"
3.2. Initialize a repository
- create a folder for testing
mkdir learngit
                cd learngit
                pwd
- initialize a repository
git init
Initialized empty Git repository in Users/ethanlin/Documents/ThingsEngine/ThingsEngine-Git.git/
- add a file name readme.md
"Git is a version control system. Git is free software." in readme.md
- add and commit
git add readme.txt

                git commit -m "create a readme file"
[master (root-commit) eaadf4e] wrote a readme file 1 file changed, 2 insertions(+) create mode 123456 readme.md
- add more files
touch file1.txt file2.txt file3.txt
git add file1.txt
                git add file2.txt file3.txt
git commit -m "add 3 files"
- adjustment for readme.md
"Git is a distributed version control system. Git is free software."
- git status
git status
On branch master Changes not staged for commit: (use "git add <file>…" to update what will be committed) (use "git checkout – <file>…" to discard changes in working directory) modified: readme.txt no changes added to commit (use "git add" and/or "git commit -a")
- git diff
git diff readme.md
diff –git a/readme.md b/readme.md
index 46d49bf..9247db6 100644
— a/readme.md
+ b/readme.md
@@ -1,2 +1,2 @@
-Git is a version control system.
+Git is a distributed version control system.
Git is free software.
- update readme.md, new version
git add readme.md
git status
On branch master Changes to be committed: (use "git reset HEAD <file>…" to unstage) modified: readme.md
git commit -m "add distributed"
[master e475afc] add distributed 1 file changed, 1 insertion(+), 1 deletion(-)
$ git status
On branch master nothing to commit, working tree clean
4. Remote Repository at GitHub
ssh-keygen -t rsa -C "youremail@example.com"
You could find a directory .ssh in your home folder. idrsa and idrsa.pub
5. Advanced Topic
5.1. Branch Management
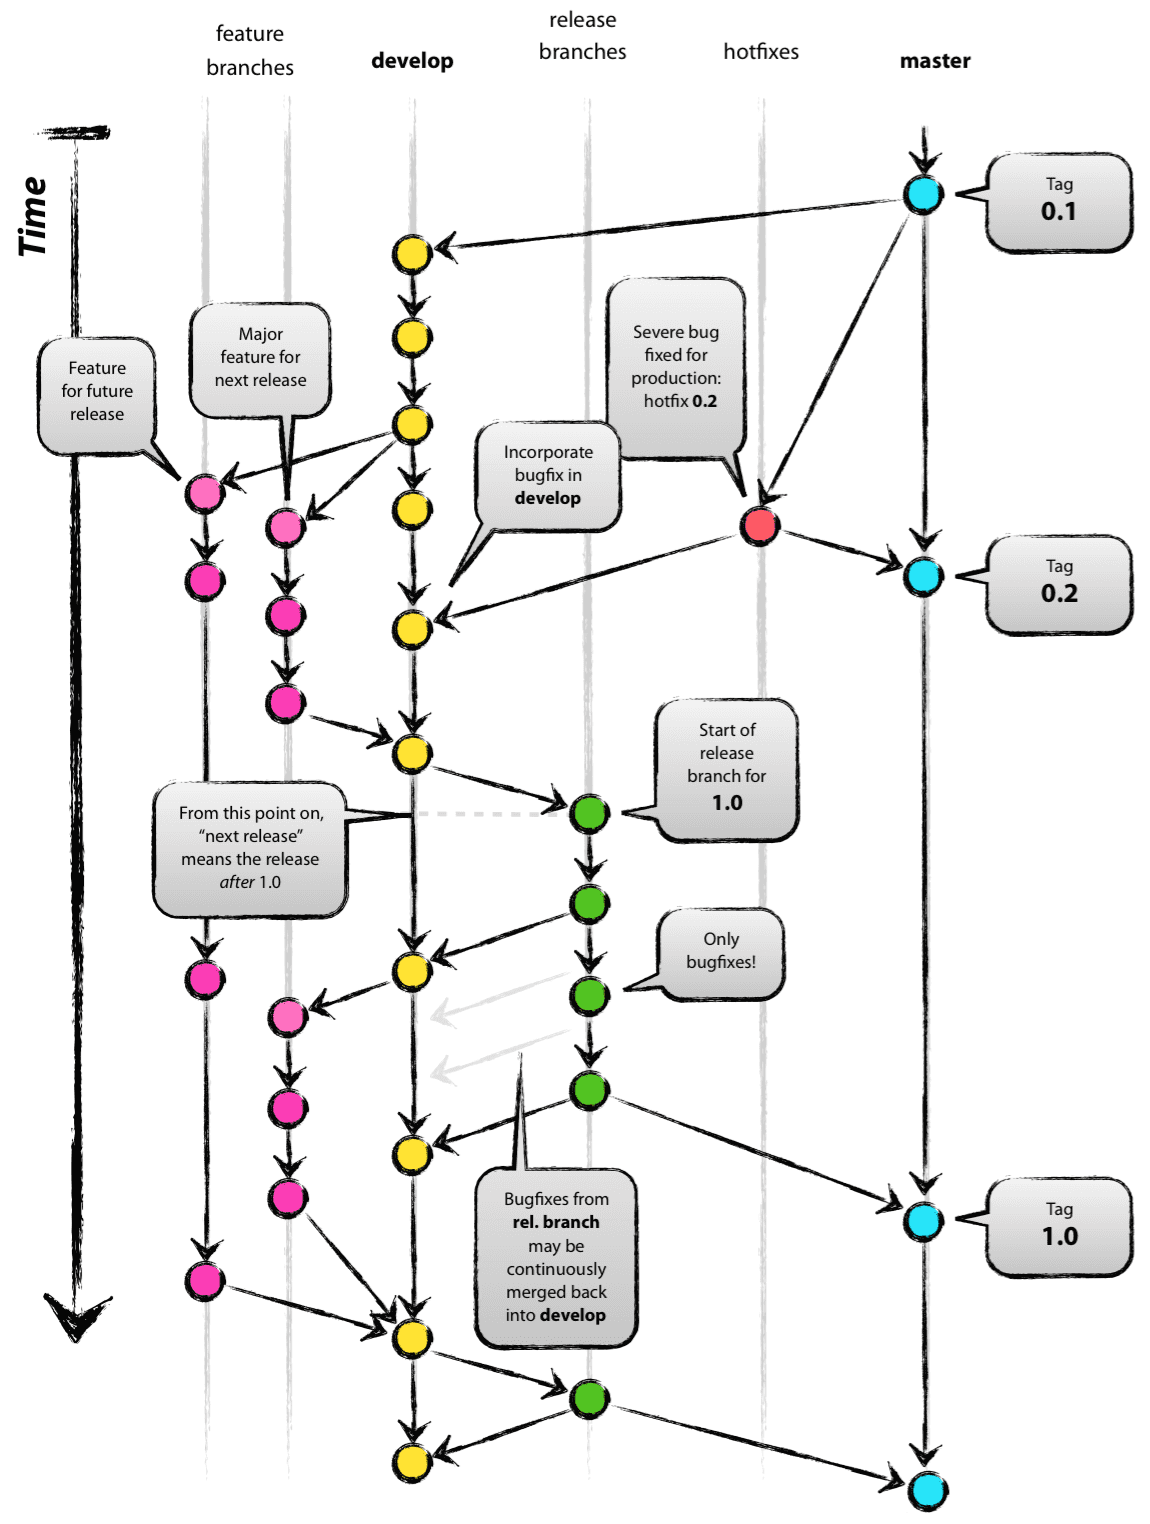
Figure 1: A successful Git branching model
Compared with SVN, one of the specific features Git has is about branch.
Teamwork in the real project development will benifit from the feature of branch. In this tutorial, the followings will be introduced:
- what is a branch
- The main branch operations
- how to achieve effective teamwork by through branch management
5.1.1. What is a branch
“A branch in Git is simply a lightweight movable pointer to one of these commits. The default branch name in Git is master. As you initially make commits, you're given a master branch that points to the last commit you made. Every time you commit, it moves forward automatically.”
5.1.2. Common operations of branches
- Creat a new branch based on the current branch
git branch develop
- Swith to the new branch
git checkout develop
- one step to create and switch to a new branch develop
git checkout -b develop
- Check the local branches
git branch
- Check the remot branches
git branch -r
Commit the readme.txt with add a new line: "Creating a new branch is quick."
                $ git add readme.txt
                $ git commit -m "branch test"
                [dev b17d20e] branch test
                1 file changed, 1 insertion(+)
- Push the created branch to github
git push origin develop
Then, switch to master branch
                $ git checkout master
                Switched to branch 'master'
Then, merge what you have done in develop branch in to master branch:
                $ git merge develop
                Updating d46f35e..b17d20e
                Fast-forward
                readme.txt | 1 +
                1 file changed, 1 insertion(+)
- Delete a local branch named develop
git branch -d develop
- Delete a remote branch named develop
git push origin :develop
- Fetch a remote branch to local
git checkout develop origin/develop
- Fetch a remote branch to local and switch to this branch
git checkout -b develop origin/develop
5.1.3. Conflict resolution
Merge conflicts occur when competing changes are made to the same line of a file, or when one person edits a file and another person deletes the same file. For more information, see "About merge conflicts."
Tip: You can use the conflict editor on GitHub to resolve competing line change merge conflicts between branches that are part of a pull request. For more information, see "Resolving a merge conflict on GitHub."
Create a new branch, such as feature1. Then,
$ git checkout -b feature_1
Switched to a new branch 'feature1'
Adjust the last line of readme.md as:
"Creating a new branch is quick AND simple."
Commit this file, readme.md in the feature1 branch.
                git add readme.md

                git commit -m "AND simple"
[feature1 14096d0] AND simple 1 file changed, 1 insertion(+), 1 deletion(-)
Switch to the master branch:
$ git checkout master
Switched to branch 'master' Your branch is ahead of 'origin/master' by 1 commit. (use "git push" to publish your local commits)
In the master branch, adjust the last line of readme.md as: "Creating a new branch is quick & simple."
Then, commit it (readme.md in master branch)
                $ git add readme.txt
                $ git commit -m "& simple"
[master 5dc6824] & simple 1 file changed, 1 insertion(+), 1 deletion(-)
There is a new commit in each of develop and master branches.
$ git merge feature1
Auto-merging readme.txt CONFLICT (content): Merge conflict in readme.txt Automatic merge failed; fix conflicts and then commit the result.
You can check the conflict by using git status:
$ git status
                  On branch master
                  Your branch is ahead of 'origin/master' by 2 commits.
                  (use "git push" to publish your local commits)

                  You have unmerged paths.
                  (fix conflicts and run "git commit")
                  (use "git merge --abort" to abort the merge)

                  Unmerged paths:
                  (use "git add <file>..." to mark resolution)

                  both modified:   readme.txt

                  no changes added to commit (use "git add" and/or "git commit -a")
We can check the readme.txt file, as the follows:
                Git is a distributed version control system.
                Git is free software distributed under the GPL.
                Git has a mutable index called stage.
                Git tracks changes of files.
                <<<<<<< HEAD
                Creating a new branch is quick & simple.
                =======
                Creating a new branch is quick AND simple.
                >>>>>>> feature1
Git uses <<<<,=======,>>>> to mark up the different contents in the different branches.
Open your favorite text editor, such as Emacs, and navigate to the file that has merge conflicts. You can adjust the readme.md as:
"Creating a new branch is quick and simple."
Then, use "git log" to show how the branch has been merged.
$ git log --graph --pretty=oneline --abbrev-commit
                  *   cf810e4 (HEAD -> master) conflict fixed
                  |\
                  | * 14096d0 (feature1) AND simple
                  * | 5dc6824 & simple
                  |/
                  * b17d20e branch test
                  * d46f35e (origin/master) remove test.txt
                  * b84166e add test.txt
                  * 519219b git tracks changes
                  * e43a48b understand how stage works
                  * 1094adb append GPL
                  * e475afc add distributed
                  * eaadf4e wrote a readme file
In the final step, you can delete the feature1 branch.
$ git branch -d feature1
                  Deleted branch feature1 (was 14096d0).
5.1.4. Merge with a new commit
When to merge from another branch, the git system normally uses "fast-forward" mode. Under this mode, once the branch is delete, the info of the branch will be also deleted.
This "fast forward" mode can be forced to be off, then, a new commit will be generated to record the info. of branch.
See the following practice using "git merge" with "–no-ff"
$ git checkout -b dev
                  Switched to a new branch 'dev'
Adjust readme.txt, and commit it.
$ git add readme.txt
                  $ git commit -m "add merge"
                  [dev f52c633] add merge
                  1 file changed, 1 insertion(+)
Then, switch to master:
$ git checkout master
                  Switched to branch 'master'
Merge the develop branch with "–no-ff" to prevent using the fast forward mode.
$ git merge --no-ff -m "merge with no-ff" dev
                  Merge made by the 'recursive' strategy.
                  readme.txt | 1 +
                  1 file changed, 1 insertion(+)
In this merge, a new commit was created and can be checked by "git log":
$ git log --graph --pretty=oneline --abbrev-commit
                  *   e1e9c68 (HEAD -> master) merge with no-ff
                  |\
                  | * f52c633 (dev) add merge
                  |/
                  *   cf810e4 conflict fixed
                  ...
This is the case how to merge without the fast forward mode.
5.1.5. Branch Management Strategy
In real application development, we should follow the following basic rules to achieve branch management:
- The master branch should be used for new version release;
- Developing activities on the develop branch
- Each user has it own branch.
So, a teamwork looks like the following diagram:
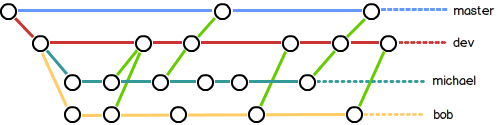
Figure 2: Branch Management for Teamwork
5.1.6. the branch of bugs
In the software development, bugs are very normal. To fix each bug, it is suggested to work on a new bug branch and once the bug is fixed, merge to the develop branch. Then, delete the created bug branch.
For example, one receives a bug labeled by "c123" and you want to create a bug branch (issue-c123) to fix this issue. However, you are working on the branch "develop" and have not committed what you have been doing.
$ git status
                  On branch dev
                  Changes to be committed:
                  (use "git reset HEAD <file>..." to unstage)

                  new file:   hello.py

                  Changes not staged for commit:
                  (use "git add <file>..." to update what will be committed)
                  (use "git checkout -- <file>..." to discard changes in working directory)

                  modified:   readme.txt
It is not because you don't want to commit what you have done. The work will need 1 day to complete and the urgent bug should be fix in 2 hours.
Git provides "stash" function. You can “storage” the current work site and wait for it to resume work after the scene is resumed.
$git stash
                  Saved working directory and index state WIP on dev: f52c633 add merge
Now, you can use "git status" to check the working directory and confirm it is clean. Then, a new branch can be created to fix the bug. You need to determine to create this branch from which branch, such as "master".
$git checkout master
                  Switched to branch 'master'
                  Your branch is ahead of 'origin/master' by 6 commits.
                  (use "git push" to publish your local commits)

                  $git checkout -b issue-C123
                  Switched to a new branch 'issue-C123'
Now, fix the bug. Assume you correct "Git is free software …" to "Git is a free software …". Then, commit the adjustment.
$git add readme.txt
                  $git commit -m "fix bug C123"
                  [issue-101 4c805e2] fix bug C123
                  1 file changed, 1 insertion(+), 1 deletion(-)
After fixing the bug, complete to merge to master from the bug branch and delete this bug branch, issue-C123.
$ git checkout master
                  Switched to branch 'master'
                  Your branch is ahead of 'origin/master' by 6 commits.
                  (use "git push" to publish your local commits)

                  $ git merge --no-ff -m "merged bug fix C123" issue-101
                  Merge made by the 'recursive' strategy.
                  readme.txt | 2 +-
                  1 file changed, 1 insertion(+), 1 deletion(-)
Now, you can switch to the develop branch to continue the "storage" work.
$ git checkout dev
                  Switched to branch 'dev'

                  $ git status
                  On branch dev
                  nothing to commit, working tree clean
Check the saving work site:
$ git stash list
                  stash@{0}: WIP on dev: f52c633 add merge
Two ways to resume the work site:
$ git stash pop
                  On branch dev
                  Changes to be committed:
                  (use "git reset HEAD <file>..." to unstage)

                  new file:   hello.py

                  Changes not staged for commit:
                  (use "git add <file>..." to update what will be committed)
                  (use "git checkout -- <file>..." to discard changes in working directory)

                  modified:   readme.txt

                  Dropped refs/stash@{0} (5d677e2ee266f39ea296182fb2354265b91b3b2a)
Using "git stash list" to check the saving working site. Nothing left.
$git stash list
"stash" can be used several times and resume a stash by specifying it:
$ git stash apply stash@{0}
Discussion:
- The bug in the master branch has been fixed. How about the same bug in the develop branch if the develop branch was created from the master branch which already had the bug?
- Redo to fix the bug in the develop branch. More efficient way? yes
"Copy" (not merge) the commit "4c805e2 fix bug C123" to the develop branch. Git provides a command named "cherry-pick" to copy a specific commit to a branch:
$ git branch
                          * develop
                          master
                          $ git cherry-pick 4c805e2
                          [master 1d4b803] fix bug 101
                          1 file changed, 1 insertion(+), 1 deletion(-)
4c805e2 and 1d4b803 are different commits and have the same contents/operations. Fix the bug in the development branch and copy to master? Yes, it works.
Conclusion:
- Fix each bug in a branch with a specific name
- Before fixing, stash the working site with "git stash". After fixing, resume the working site with "git stash pop"
- Fix in the master branch and apply to the develop branch by using "git cherry-pick <commit>".
5.1.7. the branch of features
In the process of software development, new features may be added occasionally. Suggested to create a branch for creating each feature.
$ git checkout -b feature-vulcan
                  Switched to a new branch 'feature-vulcan'
Complete it:
                $ git add vulcan.py

                $ git status
                On branch feature-vulcan
                Changes to be committed:
                (use "git reset HEAD <file>..." to unstage)

                new file:   vulcan.py

                $ git commit -m "add feature vulcan"
                [feature-vulcan 287773e] add feature vulcan
                1 file changed, 2 insertions(+)
                create mode 100644 vulcan.py
Then, switch back to the develop branch and ready to merge it into the develop branch. However, this feature is not accepted any more and you are requested to delete it because of the sensitive technologies used in this feature.
$ git branch -d feature-vulcan
                  error: The branch 'feature-vulcan' is not fully merged.
                  If you are sure you want to delete it, run 'git branch -D feature-vulcan'.
Because this branch "feature-vulcan" has not be merged, so need to force to delete it:
$ git branch -D feature-vulcan
                  Deleted branch feature-vulcan (was 287773e).
5.1.8. Teamwork on GitHub
How to build a teamwork through GitHub? As a local team member, how many branches you should push to GitHub? and What branches you should manage locally?
When you clone a repository from GitHub, it will automatically set the local default master branch upstream to the remote one in GitHub, and the default remote branch is named as "origin".
Check the info. of the remote repository:
$git remote
                  origin
You can also use “git remote -v” to check more details, sush as the fetch and push needed rights:
~$ git remote -v
                  origin  git@github.com:michaelliao/learngit.git (fetch)
                  origin  git@github.com:michaelliao/learngit.git (push)
- Push branches
Pushing branches means to push the committed files to the remote repository. The local repository should map to the remote one. The local default repository is origin which is mapping to the master in the remote one.
$ git push origin master
When pushing, the local branch should be specified to the remote one, origin. Such as:
git push origin master
For other branches, such as develop:
git push origin develop
As we discussed working on many branches, such as master, develop, bug, feature branches, which need to be kept in local and which need to be pushed to the remote repository?
"master" and "develop" need to be pushed and for others, we normally work on locally and merger to "develop" and/or "master". The benefits to create some branches other than master and develop are for clear developing records and management.
A teamwork scenario for practice:
Working on a team, you will push to the master or develop branch in GitHub. Now, we simulate you start to work in a team.
Clone a repository in the GitHub:
$ git clone git@github.com:Ethanlinyf/learngit.git
                      Cloning into 'learngit'...
                      remote: Counting objects: 40, done.
                      remote: Compressing objects: 100% (21/21), done.
                      remote: Total 40 (delta 14), reused 40 (delta 14), pack-reused 0
                      Receiving objects: 100% (40/40), done.
                      Resolving deltas: 100% (14/14), done.
Just the master branch is cloned in the local machine. You can use "git branch" to check:
$ git branch
                      * master
If you want to work on the branch develop, you need to create the develop branch and map to the remote develop branch in GitHub:
$ git checkout -b develop origin/devThen, you can work on the created branch, develop and push the commits to the remote one.
$ git add env.txt

                      $ git commit -m "add env"
                      [dev 7a5e5dd] add env
                      1 file changed, 1 insertion(+)
                      create mode 100644 env.txt

                      $ git push origin dev
                      Counting objects: 3, done.
                      Delta compression using up to 4 threads.
                      Compressing objects: 100% (2/2), done.
                      Writing objects: 100% (3/3), 308 bytes | 308.00 KiB/s, done.
                      Total 3 (delta 0), reused 0 (delta 0)
                      To github.com:michaelliao/learngit.git
                      f52c633..7a5e5dd  dev -> dev
Your team partners may push their commits including the documents/codes before you are working on. And you may push want you have done to the repository in GitHub:
$ cat env.txt
                      env

                      $ git add env.txt

                      $ git commit -m "add new env"
                      [dev 7bd91f1] add new env
                      1 file changed, 1 insertion(+)
                      create mode 100644 env.txt
                      $ git push origin dev
                      To github.com:michaelliao/learngit.git
                      ! [rejected]        dev -> dev (non-fast-forward)
                      error: failed to push some refs to 'git@github.Ethanlinyf/learngit.git'
                      hint: Updates were rejected because the tip of your current branch is behind
                      hint: its remote counterpart. Integrate the remote changes (e.g.
                      hint: 'git pull ...') before pushing again.
                      hint: See the 'Note about fast-forwards' in 'git push --help' for details.
"error: failed to push some refs to" shows the pushing is not successful. The error requests you to solve the conflict as discussed before. But you need to checkout from the remote develop in GitHub. From the hint 'git pull …', you can pull the latest commit for the develop branch in the GitHub, origin/develop:
$ git pull
                      There is no tracking information for the current branch.
                      Please specify which branch you want to merge with.
                      See git-pull(1) for details.

                      git pull <remote> <branch>
                      If you wish to set tracking information for this branch you can do so with:

                      git branch --set-upstream-to=origin/<branch> dev
It shows the pull is not successful. The reason is that you did not map the local develop branch to the remote one. From the hint, you can build the link for them:
$ git branch --set-upstream-to=origin/dev dev
                      Branch 'dev' set up to track remote branch 'dev' from 'origin'.
Then, pull again:
                    $ git pull
                    Auto-merging env.txt
                    CONFLICT (add/add): Merge conflict in env.txt
                    Automatic merge failed; fix conflicts and then commit the result.
It shows you are successful to pull the latest version of the remote develop branch in GitHub and a conflict pops up, which needs you to manually resolve it, see the topic " Conflict resolution". The, commit and push to the remote develop branch:
$ git commit -m "fix env conflict"
                      [dev 57c53ab] fix env conflict

                      $ git push origin dev
                      Counting objects: 6, done.
                      Delta compression using up to 4 threads.
                      Compressing objects: 100% (4/4), done.
                      Writing objects: 100% (6/6), 621 bytes | 621.00 KiB/s, done.
                      Total 6 (delta 0), reused 0 (delta 0)
                      To github.com:michaelliao/learngit.git
                      7a5e5dd..57c53ab  dev -> dev
In summary, the teamwork through GitHub can be concluded as follows:
- git push origin <branch-name>
- if not successful, it shows the remote one is newer than you fetched it before. git pull needed.
- if there are some conflicts after git pull, resolve them first and commit; if it shows "no tracking information", you need to map the local branch to the remote one.
- Then, re-push again
This is how teamwork can be achieve through GitHub.
5.1.9. Rebase
In the previous discussion, we can see that it is easy to get conflicted when a team working on the same branch. Even no conflict there, you may need to pull first and merge to the one locally and then after your job, you just can push successfully. See the example:
$ git log --graph --pretty=oneline --abbrev-commit
                  * d1be385 (HEAD -> master, origin/master) init hello
                  *   e5e69f1 Merge branch 'develop'
                  |\
                  | *   57c53ab (origin/develop, develop) fix env conflict
                  | |\
                  | | * 7a5e5dd add env
                  | * | 7bd91f1 add new env
                  | |/
                  * |   12a631b merged bug fix 101
                  |\ \
                  | * | 4c805e2 fix bug 101
                  |/ /
                  * |   e1e9c68 merge with no-ff
                  |\ \
                  | |/
                  | * f52c633 add merge
                  |/
                  *   cf810e4 conflict fixed
The records look mess. Is it possible to make the work flow clear? Yes, using "rebase"
Let's have a look how to make forks become a clear line stream.
After synchronisation with the remote branch, two commits are attempted for the file "hello.py". We use "$git log" to check the record:
$git log --graph --pretty=oneline --abbrev-commit
                  * 582d922 (HEAD -> master) add author
                  * 8875536 add comment
                  * d1be385 (origin/master) init hello
                  * e5e69f1 Merge branch 'develop'
                  |\
                  | *   57c53ab (origin/dev, develop) fix env conflict
                  | |\
                  | | * 7a5e5dd add env
                  | * | 7bd91f1 add new env
                  ...
It shows the recent branch HEADs for the local master (HEAD -> master) and the remote one (origin/master) are "582d922 add author" and "d1be385 init hello". The local mast branch has two more commits than the remote one.
Now, we try to push the local master branch to the remote one.
$ git push origin master
                  To github.com:michaelliao/learngit.git
                  ! [rejected]        master -> master (fetch first)
                  error: failed to push some refs to 'git@github.com:michaelliao/learngit.git'
                  hint: Updates were rejected because the remote contains work that you do
                  hint: not have locally. This is usually caused by another repository pushing
                  hint: to the same ref. You may want to first integrate the remote changes
                  hint: (e.g., 'git pull ...') before pushing again.
                  hint: See the 'Note about fast-forwards' in 'git push --help' for details.
It is rejected because other team members pushed to the remote master branch before. Then, you need to pull it first:
$ git pull
                  remote: Counting objects: 3, done.
                  remote: Compressing objects: 100% (1/1), done.
                  remote: Total 3 (delta 1), reused 3 (delta 1), pack-reused 0
                  Unpacking objects: 100% (3/3), done.
                  From github.com:michaelliao/learngit
                  d1be385..f005ed4  master     -> origin/master
                  * [new tag]         v1.0       -> v1.0
                  Auto-merging hello.py
                  Merge made by the 'recursive' strategy.
                  hello.py | 1 +
                  1 file changed, 1 insertion(+)
And check the status:
$ git status
                  On branch master
                  Your branch is ahead of 'origin/master' by 3 commits.
                  (use "git push" to publish your local commits)

                  nothing to commit, working tree clean
Now, there are 3 commits including merging the "hello.py" to the local branch ahead the remote one.
                $ git log --graph --pretty=oneline --abbrev-commit
                *   e0ea545 (HEAD -> master) Merge branch 'master' of github.com:michaelliao/learngit
                |\
                | * f005ed4 (origin/master) set exit=1
                * | 582d922 add author
                * | 8875536 add comment
                |/
                * d1be385 init hello
                ...
Then, to make the work flow clear, "rebase" can be used:
$ git rebase
                  First, rewinding head to replay your work on top of it...
                  Applying: add comment
                  Using index info to reconstruct a base tree...
                  M	hello.py
                  Falling back to patching base and 3-way merge...
                  Auto-merging hello.py
                  Applying: add author
                  Using index info to reconstruct a base tree...
                  M	hello.py
                  Falling back to patching base and 3-way merge...
                  Auto-merging hello.py
How it works:
$ git log --graph --pretty=oneline --abbrev-commit
                  * 7e61ed4 (HEAD -> master) add author
                  * 3611cfe add comment
                  * f005ed4 (origin/master) set exit=1
                  * d1be385 init hello
                  ...
It shows the forked record becomes a single log stream. How does it achieve? The local two commits are moved after the "f005ed4 (origin/master) set exit=1". After rebase operation, the contents are the same, except the commits changed to rebase "f005ed4 (origin/master) set exit=1", not "d1be385 init hello". However, after the commit "7e61ed4", the contents are the same.(What's the prons and cons of "rebase"?)
$ git push origin master
                  Counting objects: 6, done.
                  Delta compression using up to 4 threads.
                  Compressing objects: 100% (5/5), done.
                  Writing objects: 100% (6/6), 576 bytes | 576.00 KiB/s, done.
                  Total 6 (delta 2), reused 0 (delta 0)
                  remote: Resolving deltas: 100% (2/2), completed with 1 local object.
                  To github.com:michaelliao/learngit.git
                  f005ed4..7e61ed4  master -> master
You could check it by "git log":
$ git log --graph --pretty=oneline --abbrev-commit
                  * 7e61ed4 (HEAD -> master, origin/master) add author
                  * 3611cfe add comment
                  * f005ed4 set exit=1
                  * d1be385 init hello
                  ...
The remote record also become a straight work flow, not forked one.
Conclusion:
- The rebase operation is used to straighten out the commits from your teamwork.
- The main purpose of rebase operation is to rewrite the commit history in order to produce a straight, linear succession of commits.
Reference: https://www.git-tower.com/learn/git/ebook/en/desktop-gui/advanced-topics/rebase#start
5.2. Bookmark Management
5.2.1. assign bookmarks
- Tagging
- Listing Your Tags
Listing the existing tags in Git is straightforward. Just type git tag (with optional -l or –list):
$ git tag
                      v1.0
                      v2.0
You can also search for tags that match a particular pattern.
$ git tag -l "v1.8.5*" v1.8.5 v1.8.5-rc0 v1.8.5-rc1 v1.8.5-rc2 v1.8.5-rc3 v1.8.5.1 v1.8.5.2 v1.8.5.3 v1.8.5.4 v1.8.5.5- Creating Tags
Git supports two types of tags: lightweight and annotated.
A lightweight tag is very much like a branch that doesn’t change — it’s just a pointer to a specific commit.
Annotated tags, however, are stored as full objects in the Git database. They’re checksummed; contain the tagger name, email, and date; have a tagging message; and can be signed and verified with GNU Privacy Guard (GPG). It’s generally recommended that you create annotated tags so you can have all this information; but if you want a temporary tag or for some reason don’t want to keep the other information, lightweight tags are available too.
- Annotated Tags
Creating an annotated tag in Git is simple. The easiest way is to specify -a when you run the tag command:
$ git tag -a v1.4 -m "my version 1.4"
                      $ git tag
                      v0.1
                      v1.3
                      v1.4
You can see the tag data along with the commit that was tagged by using the git show command:
$ git show v1.4 tag v1.4 Tagger: Ben Straub <ben@straub.cc> Date: Sat May 3 20:19:12 2014 -0700 my version 1.4 commit ca82a6dff817ec66f44342007202690a93763949 Author: Scott Chacon <schacon@gee-mail.com> Date: Mon Mar 17 21:52:11 2008 -0700 changed the version number- Lightweight Tags
Another way to tag commits is with a lightweight tag. This is basically the commit checksum stored in a file — no other information is kept. To create a lightweight tag, don’t supply any of the -a, -s, or -m options, just provide a tag name:
$ git tag v1.4-lw
                      $ git tag
                      v0.1
                      v1.3
                      v1.4
                      v1.4-lw
                      v1.5
This time, if you run git show on the tag, you don’t see the extra tag information. The command just shows the commit:
$ git show v1.4-lw commit ca82a6dff817ec66f44342007202690a93763949 Author: Scott Chacon <schacon@gee-mail.com> Date: Mon Mar 17 21:52:11 2008 -0700 changed the version number- Tagging Later
You can also tag commits after you’ve moved past them. Suppose your commit history looks like this:
$ git log --pretty=oneline
                      15027957951b64cf874c3557a0f3547bd83b3ff6 Merge branch 'experiment'
                      a6b4c97498bd301d84096da251c98a07c7723e65 beginning write support
                      0d52aaab4479697da7686c15f77a3d64d9165190 one more thing
                      6d52a271eda8725415634dd79daabbc4d9b6008e Merge branch 'experiment'
                      0b7434d86859cc7b8c3d5e1dddfed66ff742fcbc added a commit function
                      4682c3261057305bdd616e23b64b0857d832627b added a todo file
                      166ae0c4d3f420721acbb115cc33848dfcc2121a started write support
                      9fceb02d0ae598e95dc970b74767f19372d61af8 updated rakefile
                      964f16d36dfccde844893cac5b347e7b3d44abbc commit the todo
                      8a5cbc430f1a9c3d00faaeffd07798508422908a updated readme
Now, suppose you forgot to tag the project at v1.2, which was at the “updated rakefile” commit. You can add it after the fact. To tag that commit, you specify the commit checksum (or part of it) at the end of the command:
$ git tag -a v1.2 9fceb02You can see that you’ve tagged the commit:
$ git tag v0.1 v1.2 v1.3 v1.4 v1.4-lw v1.5 $ git show v1.2 tag v1.2 Tagger: Scott Chacon <schacon@gee-mail.com> Date: Mon Feb 9 15:32:16 2009 -0800 version 1.2 commit 9fceb02d0ae598e95dc970b74767f19372d61af8 Author: Magnus Chacon <mchacon@gee-mail.com> Date: Sun Apr 27 20:43:35 2008 -0700 updated rakefile ...- Sharing Tagging
By default, the git push command doesn’t transfer tags to remote servers. You will have to explicitly push tags to a shared server after you have created them. This process is just like sharing remote branches — you can run git push origin <tagname>.
$ git push origin v1.5
                      Counting objects: 14, done.
                      Delta compression using up to 8 threads.
                      Compressing objects: 100% (12/12), done.
                      Writing objects: 100% (14/14), 2.05 KiB | 0 bytes/s, done.
                      Total 14 (delta 3), reused 0 (delta 0)
                      To git@github.com:schacon/simplegit.git
                      * [new tag]         v1.5 -> v1.5
If you have a lot of tags that you want to push up at once, you can also use the –tags option to the git push command. This will transfer all of your tags to the remote server that are not already there.
$ git push origin --tags
                      Counting objects: 1, done.
                      Writing objects: 100% (1/1), 160 bytes | 0 bytes/s, done.
                      Total 1 (delta 0), reused 0 (delta 0)
                      To git@github.com:schacon/simplegit.git
                      * [new tag]         v1.4 -> v1.4
                      * [new tag]         v1.4-lw -> v1.4-lw
Now, when someone else clones or pulls from your repository, they will get all your tags as well.
- Deleting Tags
To delete a tag on your local repository, you can use git tag -d <tagname>. For example, we could remove our lightweight tag above as follows:
$ git tag -d v1.4-lw
                      Deleted tag 'v1.4-lw' (was e7d5add)
Note that this does not remove the tag from any remote servers. There are two common variations for deleting a tag from a remote server.
The first variation is git push <remote> :refs/tags/<tagname>:
$ git push origin :refs/tags/v1.4-lw
                      To /git@github.com:schacon/simplegit.git
                      - [deleted]         v1.4-lw
The way to interpret the above is to read it as the null value before the colon is being pushed to the remote tag name, effectively deleting it.
The second (and more intuitive) way to delete a remote tag is with:
$ git push origin --delete <tagname>- Checking out Tags
If you want to view the versions of files a tag is pointing to, you can do a git checkout of that tag, although this puts your repository in “detached HEAD” state, which has some ill side effects:
$ git checkout 2.0.0
                      Note: checking out '2.0.0'.

                      You are in 'detached HEAD' state. You can look around, make experimental
                      changes and commit them, and you can discard any commits you make in this
                      state without impacting any branches by performing another checkout.

                      If you want to create a new branch to retain commits you create, you may
                      do so (now or later) by using -b with the checkout command again. Example:

                      git checkout -b <new-branch>

                      HEAD is now at 99ada87... Merge pull request #89 from schacon/appendix-final

                      $ git checkout 2.0-beta-0.1
                      Previous HEAD position was 99ada87... Merge pull request #89 from schacon/appendix-final
                      HEAD is now at df3f601... add atlas.json and cover image
In “detached HEAD” state, if you make changes and then create a commit, the tag will stay the same, but your new commit won’t belong to any branch and will be unreachable, except by the exact commit hash. Thus, if you need to make changes — say you’re fixing a bug on an older version, for instance — you will generally want to create a branch:
$ git checkout -b version2 v2.0.0
                      Switched to a new branch 'version2'
If you do this and make a commit, your version2 branch will be slightly different than your v2.0.0 tag since it will move forward with your new changes, so do be careful.
5.3. Customization
5.3.1. TBD
6. Magit Tutorial
6.1. Basic magit
6.1.1. Create a git repo
info:magit#Repository setup You can create a git repo with M-x magit-init. This will create a git-repo in the current directory.
(magit-init)
6.1.2. Clone a repo
M-x magit-clone
This will prompt you for a repo, which is either a url, or a path, and a path to clone it to.
6.1.3. Check the status of your repo
Run M-x magit-status to see the status of your repo.
Press "g" in the window to refresh it.
press "n" (next) or "p" (previous) to navigate in this window.
6.1.4. Stage a file
info:magit#Staging and unstaging
In the magit-status window, put your cursor on an unstaged file and press "s".
If you press TAB on the file, it will expand to show the changes that are unstaged. Deletions show in red, and additions in green. The changes are in "hunks".
You can unstage a file with "u"
6.1.5. Commit a file
info:magit#Initiating a commit
info:magit#Editing commit messages
In the magit-status window with some files that are staged, press "c", review the options, and probably press "c" again. Enter a commit message and type "C-c C-c" to commit it, or "C-c C-k" to cancel it.
6.1.6. Diffs
From the magit-status window, press "d" then "d" to see what has changed.
6.1.7. See the log
In the magit-status window press "l", review the options, and press "l" again.
If you want to see only the commits that affected a file, in the magit-status window press "l" then "=f", enter the filename, and then press "l" again.
6.1.8. Push
In the magit-status window press "P" then "p".
Note that tags don't normally get pushed, but there are options ("T" to push a tag, and "t" to push all tags).
6.1.9. Pull
info:magit#Pulling In the magit-status window press "F" then "p".
6.1.10. Run a command-line git command manually
info:magit#Running Git manually In the magit-status window, type "!" to get the popup and choose what you want to do (e.g. where to run the command, etc… You do not need to type "git" in the command. Note you can also run a shell command from this interface.
6.1.11. Check the output of the git command
Press "$"
6.1.12. Keybindings
6.2. Intermediate concepts
6.2.1. Checkout an older version of a file
Use M-x magit-checkout-file select the branch, or enter a revision, and then choose a file.
6.2.2. Search the commit messages for a pattern
In a magit-status window press "l =g" enter a pattern to grep for, and then press "l".
6.2.3. Revert a commit
Got to the log, select the commit and type "V" then "V".
6.2.4. Tag a version
press "t" in the magit-status window. You can then create a tag, annotate it, delete tags, and prune them.
6.2.5. Checkout an existing branch.
In the magit-status window press "b" then "b" and choose the branch.
To checkout a new branch, in the magit-status window press "b" then "c". Choose the branch to start from then a name for the new branch.
6.2.6. Merge two branches
In the magit-status window press "m", then "m" and select the branch to merge into the current one.
6.2.7. TODO Resolving conflicts
info:magit#Resolving conflicts
You will probably also want to get familiar with info:ediff#Top.
On a file in a magit-status window, press "e" to enter the 3-window ediff view. The A window is the version at HEAD, the B window is what is in the index, and the C window is the current version.
6.2.8. Fetching
In the magit-status window press "f".
6.2.9. Add a remote
M-x magit-remote-add then enter an alias, and the url.
6.2.10. Stashing
Press "z" in the magit-status window
6.2.11. Git blame
6.3. Advanced concepts
6.3.1. Resetting
6.3.2. Rebasing
- Interactve rebasing
Open the log, select the oldest commit you want to rebase on then press "r" and then "i". Use M-p and M-n to move commits around. Press "s" on any commits you want to squash into the commit above it. C-c C-c will start the commands.
From the magit-status on unpushed commits, you can also press "r" to get the rebase popup.
- Reword a commit message
"r w" allows you to reword the commit message.
6.3.3. Create patches
info:magit#Creating and sending patches
In magit-status window, press "W"
"W p" creates patches "W r" makes a pull request. This just creates an email with information in it. It is not a GitHUB request, and it is only useful if there is a public, external copy of the repo.
6.3.4. Cherry-picking
Press "A"
6.3.5. Apply patches
6.3.6. Notes about commits
Press "T" to attach a note.
A typical use of notes is to supplement a commit message without changing the commit itself. Notes can be shown by git log along with the original commit message. To distinguish these notes from the message stored in the commit object, the notes are indented like the message, after an unindented line saying "Notes (<refname>):" (or "Notes:" for refs/notes/commits).
6.3.7. Cherry-picking
7. Tips
remove all files in the .gitignore
git rm -r --cached .
                  git add .
                  git commit -m 'Removed all files that are in the .gitignore'
                  git push origin master
8. Other topic
8.1. gitignore
- file